(One quick heads-up before we get started…this post contains affiliate links, which means—at zero cost to you—I will earn a small commission if you click through and make a purchase. Thank you for your support!)
A couple of weeks ago, I shared my 5 Hidden Gem Children’s Book Niches That Make $1000+ a month. In that video, I mentioned “connect-the-dots” activity books (aka dot-to-dot activity books) as one of those niches.
Based on interest from my community, I created this tutorial to walk you through the steps to create a connect-the-dots book using Affinity Publisher.
If you don’t have Affinity Publisher, no worries! The basics of what I’m going to show you will essentially be the same no matter what program you’re using, so you’ll still be able to follow along using the vector editing software of your choice.
Some examples of other programs (free and paid) are:
- Adobe Illustrator (paid)
- Inscape (free)
- Gravit Designer (free version)
In this tutorial, you’ll learn how to:
- choose vector artwork for your connect-the-dots book
- edit the artwork using Affinity Publisher (or a vector editing program of your choice)
- upload your finished book to sell on Kindle Direct Publishing (KDP)
Note: Affinity does have its own dedicated vector editing software called Affinity Designer, but Affinity Publisher actually has all of the functionality you need. Because you’re turning this into a book at the end anyway, it actually makes the most sense to do everything in one program to keep things simple.
You can learn more by watching this video or reading below for a summary of everything I discuss.
Choosing Vector Artwork For Your Connect-The-Dots Book
In addition to vector editing software, you’ll also need some simple vector artwork images to use for the connect-the-dots activities in your book. My go-to place for these is Creative Fabrica. I love Creative Fabrica because they have tens of thousands of quality fonts and designs. They also have one of the best licenses for low-content publishers, so be sure to check them out.
Here are a few tips for selecting images to work with:
- decide on your general age group and choose artwork accordingly
- use simple vector artwork
- coloring pages are perfect for dot-to-dot books
- look for bundles that contain multiple images in the same style. If you can’t find bundles for the theme you’re looking for but you do find a graphic you like, click on that artist’s page; they’ll likely have more artwork in that same style.
- try not to combine artwork from different artists if the styles are very different; you want your completed book to look cohesive
- look for SVG or EPS files. These are vector files that you’ll be able to manipulate using a vector editing program.
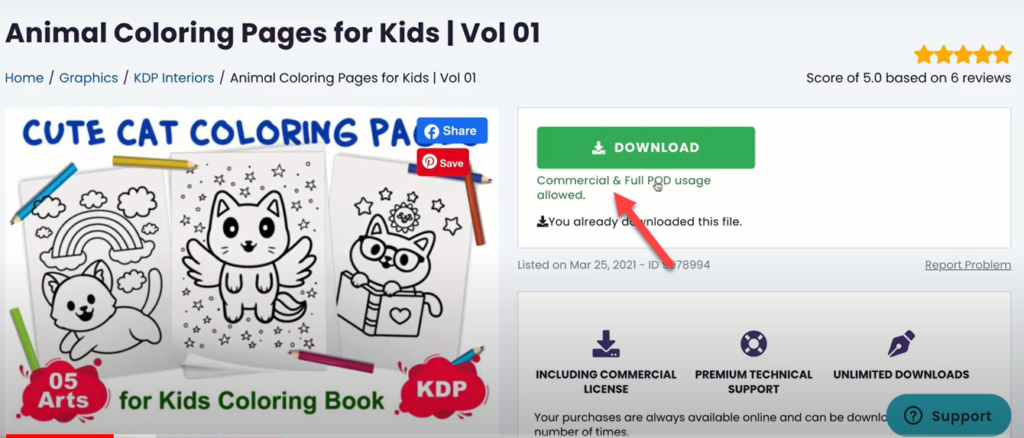
I’ll be using a bundle of animal coloring pages for this tutorial. Coloring pages are really great for this project because they’re in black and white. You don’t want color images in connect-the-dots books, so if you choose color graphics you’ll have to remove the colors.
If the graphics you like aren’t ready to use like these, check out my Coloring Books in Affinity Publisher video, in which I show you how to edit graphics to remove color and other unwanted elements.
Be sure that the graphics you use have a Commercial AND full Print-on-Demand (POD) usage license. This license allows you to keep selling books you’ve published containing altered Creative Fabrica images even if you cancel your Creative Fabrica subscription. I encourage you to customize the images you download because it will make your images unique.
A Step-By-Step Connect-The-Dots Tutorial
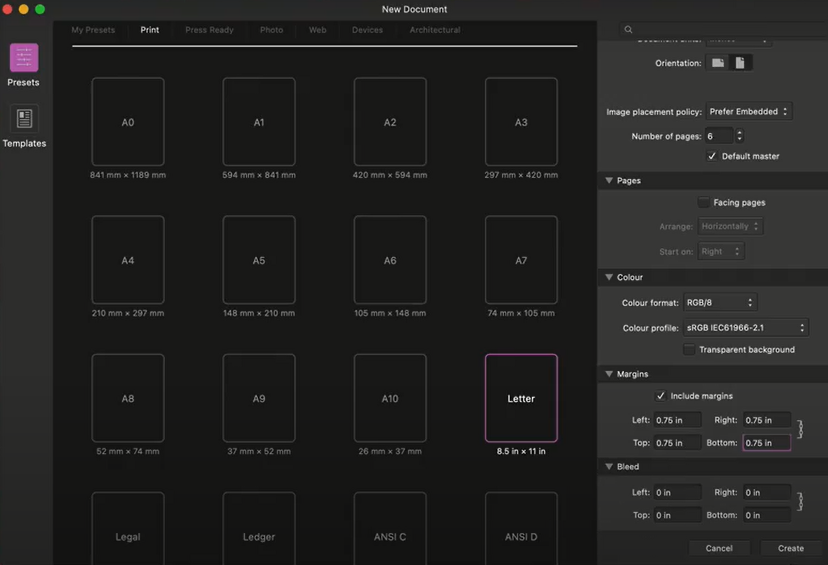
The first step is to open Affinity Publisher and select the page size, margins, and number of pages your book will have. You won’t need a bleed for this because you won’t have any design elements that bleed off the page.
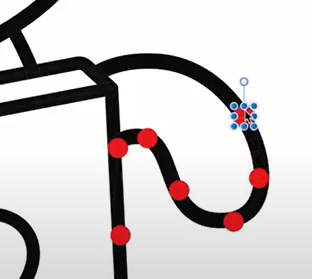
Next, import your images into the document and remove/edit any imperfections you find, such as this line overlap in one of my images:

Now it’s time to create the “dots” for your connect-the-dots images. It’s a good idea to look at some other connect-the-dots books on Amazon to get a general idea of how these activities are presented.
Use the ellipse tool in Affinity to begin mapping out the dots around the outer edge of the image only. I like to make the dots red for now so that they’re easy for me to see as I work. You’ll turn them to black later.

Use your best judgment when deciding how many dots you want and how close you want them to be. The main thing is to keep them consistently spaced and make them the same size.

When going around curves, you’ll want the dots a little bit closer together to help guide the person connecting the dots.
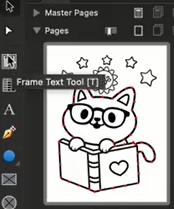
Once you’ve finished adding dots to the image, lock the layer. Then create a new layer for the numbers. A simple sans serif font such as Avenir works well for this. Use the frame tool to start adding numbers.
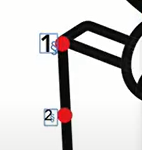
Many books make the starting dot (number 1), a bit bigger than the other numbers so it’s easy to see where to start.
Once you have all of the numbers in place, lock that layer.
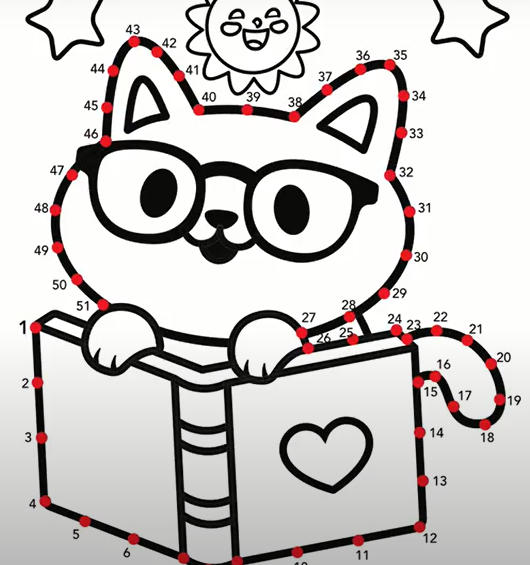
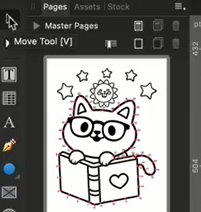
Next, using the “Move” tool, start removing all of the strokes (lines) that your sequence of dots follows. All other lines in the image should remain. In the example you can see that the cat’s face and paws, the spine and top edges of the book, and the heart are not removed.

Now you can turn all those red dots black by selecting all in that layer and changing the color to black.
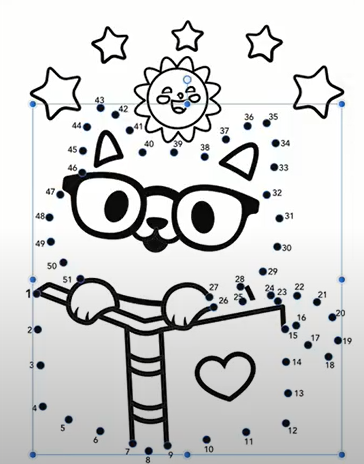
Look over the picture to see if there are any areas that need to be cleaned up. Also, remember to customize your image wherever possible to make it more unique.
You’re done with your first page!
You’ll repeat this same process for as many images as you’re going to include in your book.
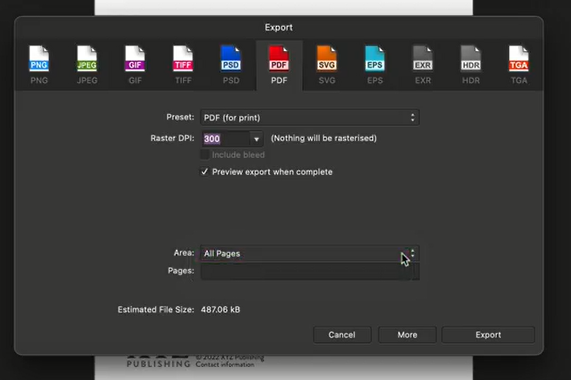
Once you’ve gotten all of your pages complete (including the title and copyright pages), export your book as a PDF file.
For the cover, you’ll need a completely separate file to upload to KDP. For help with creating a cover for KDP, check out my video, How to Create a Book Cover in Affinity Publisher.
I hope you’ve found this tutorial for creating a connect-the-dots book helpful. If you’re interested in learning more about creating low-content books using Affinity Publisher, check out some of my previous tutorials:
- How to Use Affinity Publisher
- Create a Coloring Book in Affinity Publisher Using Vector Artwork
- Create A Coloring Book With Your Own Art (and Sell It on Amazon KDP!)
- How to Create a Book Cover in Affinity Publisher
- Speed Up Your Low-Content Book Design Using Text Styles in Affinity Publisher
- How to Edit and Customize a PDF Template In Affinity Publisher
FREE GUIDE: 3 Steps to Publishing Your First Low-Content Book in Less Than a Day
MORE LOW-CONTENT PUBLISHING TIPS: https://www.rachelharrisonsund.com/
FREE PRIVATE FACEBOOK GROUP: https://www.facebook.com/groups/LCProfits